When we heard about the word "overclocking", most ordinary people would mind fixed on the complexity of computer systems that are dismantling the complex, while others will imagine the figure of a maniac computer (complete with all its peculiar attribute) is to disassemble the computer. Of course many of these things are not true.
This article tries to give an explanation that is more "grounded" on the world of overclocking as well as invite us who still lay hidden computer to optimize the potential that we use everyday in a way to overclock it. Enjoy.
Introduction & definition overclocking
Overclocking is forcing the clock as the name suggests a peripheral, usually the clock of the processor, higher than the standard. In its development, overclocking is not necessarily related to the increase in clock, but also when we force a peripheral work faster than the standard. (Clock: unit of frequency that occur in 1 time, for in the know only: Mhz processor is calculated from the multiply FSB multipliers, or commonly called the multiplier. Example: Intel Pentium 2.66 GHz = 20 x 133, where 20 is a multiplier factor, while the 133 is the FSB of the processor.)
Initially, people do overclocking just to get a faster system than the standard even approaching his system specs are above the system he has. But in its development overclocking becomes a hobby, a new trend in the computer world. Overclocking is not only aimed to obtain an equivalent system with a system that was on it but also go beyond the system. Even now there is a trend where overclocking is used to get a system that is really beyond the limits of logic, or even far beyond the capacity of the fastest systems that already exist.
Common computer peripherals and general overclock is the clock of the processor, FSB processors, the mainboard FSB, memory timings, memory FSB, memory clock and core VGA, VGA memory timings. Do not stop there, still no change in voltage / voltage on a pro sessor, memory, vga, & chipset to run stable at the overclocked system.
Why should any change in voltage / voltage? As we know a certain computer peripherals slightest require electrical power to work / walk. If we raise / change the clock from a peripheral clear these peripherals require only enough power to work / run stable. Therefore, one important factor in overclocking is to supply enough power from the power provider, the Power Supply.
Effect of a peripheral when the overclock is to make the performance of these peripherals is faster than the standard side effects Peripheral temperature is hotter than it should, system instability, even making these peripherals would not work. The things is what makes someone who wants to explore overclocking reluctant to start, but in no degree-level overclocking own. Overclocking itself is divided into 3: Safe-OC, Real-OC, & Extreme-Overclocking of ways and different goals.
In the next part will be given a short way how to optimize your PC by overclocking with side effects as small as possible in everyday computer use. Which can be called by 'the safe-overclocking' or also sometimes called 'optimization'.
Safe-overclocking / optimization on the PC
Safe overclocking is optimizing your PC safely without the need for changes or additional equipment on existing systems. To scope this time, we will consider only computers that have Windows operating system, citing nyaknya ba-available software for this operating system and also with consideration of many who use this operating system. Microsoft Windows that we discuss here is Windows the most widely used by computer users, namely Windows XP.Before you start overclocking, you should already know what's contained in your system, what type of processor it, how the FSB is default, how your memory timings, and so forth. To find out you can see in the box sales, or if they do not want to bother you should use a software 'Hardware diagnostics' which point to inform any attached peripheral in your system. Variations of the software there are many, but we usually use Sisoftsandra, or Everest Home Edition can be downloaded at www.lavalyst.com.
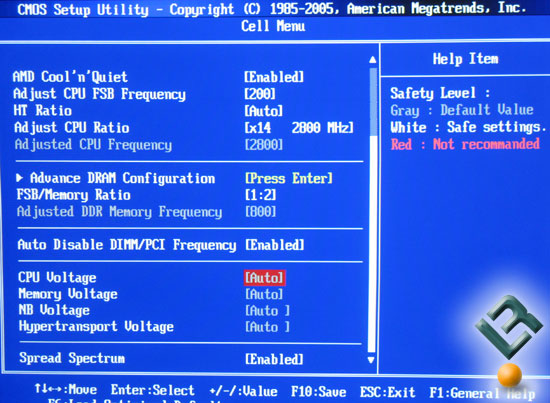
Previous noteworthy that not all motherboards have overclocking support via BIOS. To find out if your motherboard supports overclocking features (in this context is Safe Overclcoking), Read your mainboard manual, in the BIOS, whether there is a setting on the processor clock speed, FSB processor, the timing of the processor. If no, there are other alternative is to use overclocking software (some brands overclockingnya mainboard has its own software, and usually if there is any software overclocking then the BIOS supports overclocking). Software that is commonly used to overclock is ClockGen which can be downloaded atwww.cpuid.com.
How it works ClockGen is with direct access to clock generator IC on the mainboard. But this software can only be to raise the clock alone, can not change the memory timings. Therefore here ClockGen will not discuss further this time because our focus is on the memory FSB to FSB processor and memory timings alone.
Once we know what the contents of the system in use and also the BIOS supports overclocking features, now we must know what are the settings that must be modified for our computer running optimally. For the context of our optimization will only change the FSB setting from memory to the processor FSB and memory timings without changing the voltage of the memory and processor.
Intel-based systems different ways optimalisasinya with AMD-based systems. Here we will give you outline how the optimization of both systems in a separate attachment.Although we believe the optimization carried out earlier could actually be applied without any problems, but for prevention only when the computer has something wrong, like for example, will not boot, or the computer suddenly restarts when loading Windows (Windows loading failed), or we also get an error message when signing into Windows then do the following steps:
If the computer will not boot and beeps long, that means setting the inserted memory does not match the memory (memory not want to run with these settings.) The solution of this problem is to try our total turn off the computer (or electricity directly from the main stavolt, wait 1 minute and turn back, if still dead and sound then we have to turn off the computer and open the casing, locate the jumper to clear-cmos (can be seen in your mainboard manual where these jumpers.)
If the computer suddenly restarts when loading Windows or any error message when going into Windows, can cause all sorts. If you overclock the processor then maybe the power / voltage needed by the processor is not enough, try to restore the processor clock. If the same problems still occur also then try to restore the settings back as its original state. How to re-enter the BIOS, and select [Load Optimized Defaults].When we have problems when the need to restore the situation to its original condition, that is when we know that the peripherals that we use are optimal (in the context of the safe overclock).
Next, Real-Overclocking. Here the addition of voltage is required, the replacement of peripherals can also be an appropriate choice. When will 'level' Extreme-Overclocking is achieved? When a computer is no longer the standard setting as a normal computer, it is no longer able to run day-to-day without using a better cooling, and you certainly will feel that it all still not enough. And for sure you still want more than the previous result.
Testing safe-overclocking
After we perform the optimization on the PC now is the time for testing. Why do we need a test? Because we must ensure that the system runs without any problems. Testing is also done if we want to know what is the performance obtained from the optimization results.
Prime95 function is actually a search for new prime numbers by using the maximum power the processor and our memory. This software is vulnerable to error when we run the system had not stabilized. This is because when calculating and looking for prime numbers, when to see just a little mistake then this program will refuse to continue. This is why Prime95 used by overclockers to test the stability of their system after the overclock. Prime95 is usually used is version 22.1.2. To get it please download the address www.mersenne.org/prime.htm.
Download the program on your computer. Here are the steps the user:
Install software Prime95 and run the application.
Select the [Options] and click on the [CPU].
Setting [Daytime Available Memory] & [Nightime Available Memory] with a value of half of the amount of main memory is installed (Example: You have 512 MB RAM capacity, then the two columns filled with 256 MB), then click [OK].
Select again the [Options] and click on the [Torture Test] and let the test run for 24 hours.
If there are errors, the first time you have to do is setting the memory timings back like its original state. If there are errors, do the [Load Optimized Settings] in the BIOS menu.
Actually the most important tests are tests performed with real-life application, with the usual applications we use everyday. For example, if we can listen to music while doing office / college / school without any problems, play your favorite games without a problem, open an image file and edit it with image software also without any problems? With optimization technique that we just do should we use the system running stable and with higher performance than before (there is no 100% guarantee that all systems can run stable).
In the context of optimization / safe-overclocking we just did, it can be translated from the advantages and disadvantages:
Advantages:
Performance is higher than the previous system without the cost. Adding knowledge about the hardware.
Understand how to solve problems on computers.
Disadvantages:
Almost none, except the time set aside for this optimization.
Profit & loss gained from overclocking
Why are not losses associated with the hardware on your system? Because we do is optimize the settings. Why is the manufacturer of a peripheral is not in settings like that? Compatibility is the main problem. As we know, a perioheral the same time (the example of his memory) made by different manufacturers, to avoid problems later on towards the products they make. So they usually make setting on these peripherals to setting the most secure / low.
Based on our experience, peripherals, these peripherals can be set higher without any problems at all. This is why Safe-overclocking can & easy to put into practice immediately.
More about overclocking
After we saw an example earlier, you may now wonder whether we really do that? What we'd do is to enlarge the flow of data between the processor - chipset - Intel or system memory on the processor-memory on AMD and shortening the memory access to data that is in though, so the flow of data to be transferred more quickly. Why such a thing can be said to overclocking, whereas no increase in processor clock?
As we said earlier, that overclocking it is basically a system that we use today run faster and stable than ever. And the new technique described is the easiest technique to be performed without any risk to damage your hardware that would be detrimental. We also draw attention during overclock still have to be careful.
Overclocking is actually already started to be supported by almost all producers fairy [heral computer, which is spearheaded by one of the mainboard manufacturer from Taiwan since 1993. Maybe for those who already use computers a long time ago still remember how hard it is to assemble their own systems we have bought because they have to change the jumpers on the mainboard to mainboard identify the processor that we use. But now the producers have made for these settings can be done from the BIOS only, without touching the mainboard at all, even on some manufacturers already provide the setting to change the voltage / voltage for peripherals in it.
This is the gap for the overclockers to facilitate them to overclock their system, until the mainboard manufacturer was made Under-Windows overclocking software that can be used without having to go into the BIOS.
It is also viewed by the overclockers usually quality peripherals. Examples such as the mainboard manufacturer, the manufacturer of the capacitors contained in the mainboard, the manufacturer and the serial chip used by the memory, date and a specific series of a processor, the date of manufacture of a VGA, and still many others. Things like the above greatly affects overclocking will be done. Why is that?
We will describe a little along with an example:
We take the example is easy on the processor. Why are the dates and specific series of these processors can overclock higher than other series? A processor consists of core and board the place puts corenya, both of these affect the final quality of a processor in production. One-time production processes can occur both good quality, all processors are made on that date are very good quality. But if only one of two things is good, then good quality. Likewise, when the production process both of them not so good then the quality could be said on average. Why at some point the production process can be good at other times just average? This is related to how a processor manufacturer makes their products. The cost to make the processor is not small. Also affecting is the way of creation. A processor is made using a laser beam fired intensity such that the processor was formed as we see now.
"At certain moments of the production process of these processors sometimes less focused laser so the results are less than perfect. This is why there is a very good processor (we call processor "gold") and there is an average. To determine differences in the quality of each of these processors we usually try one by one processor to date and a different series or so-called batch code ".
Another example is easy also in view of the manufacturer mainboard / other peripherals. Why is that? Because when a manufacturer always makes a quality board, the manufacturer will always be known for their product reliability. All we can see there are a few producers specifically created mainboard for overclockers.
Producers from the beginning is specialized to make products for the overclockers. Quality components in their mainboard is a component of the upper class, the features of the BIOS they strongly support overclocking, because they were the first in the world to introduce innovation mainboard without jumpers, all can be set simply from BIOS. As was discussed earlier, the feature of setting the FSB, voltage / voltage, memory timings can change so easily in the BIOS. So that we can emulate the setting of a similar system but the specification is higher than our system.
That gap is used by overclockers to overclock their system. Regardless of how will they live for the sake of getting a higher system than the other just for the sake of inner satisfaction only. For now, overclocking is not able to be a job. But one of the effects of overclocking that is knowledge about hardware and how to fix if there is damage to the hardware that can put us together with a qualified computer technician.
Overclocking is not something frightening thing, you just need to know a little bit of a peripheral character and how to optimize it properly, that's all. The more often you deal with it & solve problems that occur, then overclocking as easy as installing software. Overclocking we think is the impact of computers in our midst. Because there are computer hackers, because there are also computer overclocker. By way & different interests but with the same purpose, namely to use their computers more than mere 'calculating machines' or 'typewriter'.


 05.00
05.00
 Hanzalah Naufal